Collecting alarms from CUCM

In RTMT there is a separate menu named “Alert Central”, where all active and history alarms of CUCM and IM&P nodes are listed. RTMT communicates with Cisco AMC service to get this info anomg other real-time data.

Service parameters for Cisco AMC looks like that:

333

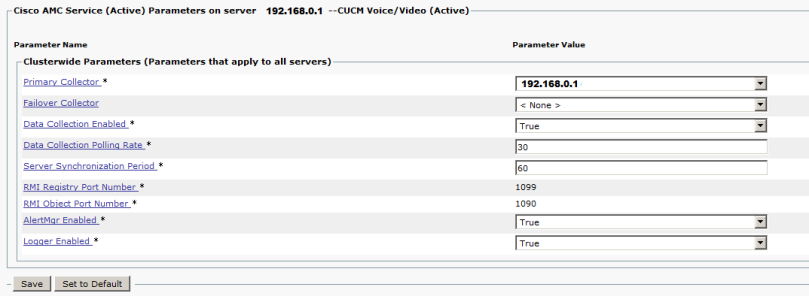
Primary collector is a node (CUCM or IM&P) which would collect logs from other nodes. Cisco suggest to choose least busy node for it. After changing Primary collector AMC service should be restarted on every node.

Logger enabled switch allows AMC logs to be saved as csv files that can be queried later.

Alert files can be found on Primary collector by issuing CLI command

file list activelog cm/log/amc/AlertLog

Files in this directory are generated at midnight every day or when AMC is restarted and file format is AlertLog_MM_DD_YYYY_HH_MM.csv (last part of HH_MM is usually 00_00 or 00_01).

In order to obtain these files programatically there is a special API for that. Here is a simple python script to get the file with alarms:


import requests
def getOneFile(node,user,passw,filename):
    header={'SOAPAction':'http://schemas.cisco.com/ast/soap/action/#LogCollectionPort#GetOneFile'}
    raw_xml = """<soapenv:Envelope xmlns:xsi="http://www.w3.org/2001/XMLSchema-instance" xmlns:xsd="http://www.w3.org/2001/XMLSchema" xmlns:soapenv="http://schemas.xmlsoap.org/soap/envelope/" xmlns:soap="http://schemas.cisco.com/ast/soap/">
   <soapenv:Header/>
   <soapenv:Body>
      <soap:GetOneFile soapenv:encodingStyle="http://schemas.xmlsoap.org/soap/encoding/">
         <FileName xsi:type="get:FileName" xmlns:get="http://cisco.com/ccm/serviceability/soap/LogCollection/GetFile/">/var/log/active/tomcat/logs/manager.2016-02-11.log</FileName>
      </soap:GetOneFile>
   </soapenv:Body>
</soapenv:Envelope>""".format(filename)
    try:
        response=requests.post('https://'+node+':8443/logcollectionservice/services/DimeGetFileService',data=raw_xml,auth=requests.auth.HTTPBasicAuth(user,passw),verify=False,headers = header)
        return response.text
    except:
        return -1
if __name__ == '__main__':
    print getOneFile('192.168.0.1','admin','admin','/var/log/active/cm/log/amc/AlertLog/AlertLog_02_08_2016_00_00.csv')


The user, which queries the file might be your administrator Application user with access to AXL applications.

The output should look like this:

Content-Type: text/xml; charset=UTF-8
Content-Transfer-Encoding: binary
Content-Id: <80DB2208357F8BD76EE58C1967C79E0D>

<soapenv:Envelope xmlns:soapenv="http://schemas.xmlsoap.org/soap/envelope/" xmlns:xsd="http://www.w3.org/2001/XMLSchema" xmlns:xsi="http://www.w3.org/2001/XMLSchema-instance">
    <soapenv:Body>
        <ns1:GetOneFileResponse soapenv:encodingStyle="http://schemas.xmlsoap.org/soap/encoding/" xmlns:ns1="http://schemas.cisco.com/ast/soap/">
            <DataHandler href="cid:BC0EDD33C6D0C7A1F6286E3691F95332" xsi:type="ns2:DataHandler" xmlns:ns2="DimeGetFileService"/>
        </ns1:GetOneFileResponse>
    </soapenv:Body>
</soapenv:Envelope>

Content-Type: application/octet-stream
Content-Transfer-Encoding: binary
Content-Id: <BC0EDD33C6D0C7A1F6286E3691F95332>

Time Stamp,Alert Type,Alert Name,Alert Message,Monitored Object Name,Severity,PollValue,Action,Node ID,Group ID
1454882401636,0,CriticalServiceDown, Service operational status is DOWN. Cisco Presence Engine. The alert is generated on Mon Feb 08 00:00:01 EET 2016 on node 192.168.0.34., ,2,0,admin@exmaple.com;,192.168.0.34,System
1454882431615,0,CriticalServiceDown, Service operational status is DOWN. Cisco Presence Engine. The alert is generated on Mon Feb 08 00:00:31 EET 2016 on node 192.168.0.34., ,2,0,admin@exmaple.com;,192.168.0.34,System


As you can see the last part of the output is the content of the file with alarms thrown by CUCM and IM&P, where every line start with a timestamp (with milliseconds). So parsing this output is rather simple.

With this in mind you can create a zabbix server check and monitor UC alarm with common software and stop relying to emails and RTMT.

Jabber bot for Cisco IM&Presence

Creating a bot for Cisco Jabber isn’t very difficult: you’d need a python3 interpreter (ships with all latests Ubuntu installations) and a slixmpp library. I’m using pip to install slixmpp like that:

apt-get install python-pip3
pip3 install slixmpp

The example from slixmpp github repo (under “The Slixmpp Boilerplate” subtitle) is working right from the box: just specify bot’s username and password and IM&P server name or IP. If you need your bot to read or calculate some data and send it to you on a regular basis here is a modified example:

import logging
import asyncio
import datetime
import time
from slixmpp import ClientXMPP
from slixmpp.exceptions import IqError, IqTimeout

@asyncio.coroutine
def asleep(t):
    yield from asyncio.sleep(t)

def calc_smth():
    return time.mktime(datetime.datetime.now().timetuple())

class EchoBot(ClientXMPP):

    def __init__(self, jid, password):
        ClientXMPP.__init__(self, jid, password)
        self.add_event_handler("session_start", self.session_start)
        self.register_plugin('xep_0199')
    def session_start(self, event):
        try:
            self.send_presence()
        except IqError as err:
            self.disconnect()
        except IqTimeout:
            self.disconnect()


    def disconnected(self, event):
        print("%s disconnect" % self.jid)

if __name__ == '__main__':
    logging.basicConfig(level=logging.ERROR,format='%(levelname)-8s %(message)s')
    try:
        xmpp =  EchoBot('bot@example.com', 'password')
        xmpp.connect(address=("IM&P IP", 5222))
        xmpp.process(timeout=0.1)
        while True:
            asyncio.get_event_loop().run_until_complete(asleep(5))
            xmpp.send_message(mto='johndoe@example.com', mbody="Timestamp={}".format(calc_smth()), mtype='chat')
    except (KeyboardInterrupt, SystemExit):
        xmpp.disconnect()
        print("Done")

Just change bot’s JID  and password (bot@example.com and ‘password’ in this example), destination JID (johndoe@example.com), modify calc_smth function for it to do something usefull instead of calculation current timestamp and launch it with

python3 bot.py

Cisco Jabber (CAXL) powered web chat

Cisco IM&Presence server provides the ability to connect to it via BOSH interface. In order to turn this feature on navigate to Cisco Unified IM and Presence Serviceability -> Tools -> Control Center – Feature Services -> choose a node -> Cisco XCP Web Connection Manager and check if it’s started and activated.

Next, check what security setting are applied to it: Cisco Unified CM IM and Presence Administration -> System -> Security -> Settings. If Enable Web Client to IM/P Service Secure Mode is checked you’ll use https to reach BOSH interface, http otherwise.

Now let’s check if BOSH interface is up: navigate to https://cup_server_name:7335/httpbinding (use http if you are not using secure connection). You browser should show something like this:

123123

This URL can be overriden by modifying Cisco Unified CM IM and Presence Administration -> System -> Service Parameters -> choose a node -> Cisco XCP Web Connection Manager -> HTTP Binding Paths Handled – Path field.

I know only 2 clients that support BOSH connections: Pidgin and CAXL, which is a Cisco javascript library. The description of the latter can be found here and library docs here.

I decided to implement web chat, based on this library. The source can be found here. You’ll need Python2 with Flask and  requests modules for it to work.

After launching the app you’ll se a login screen:

login123123123

  • username: full username with domain part, e.g. user@example.com
  • password: end user password
  • IM&P node: FQDN or IP address or IM&P Node with Cisco XCP Web Connection Manager running
  • chat alias: full group chat name in a form like chat_name@chat_alias. Navigate to Cisco Unified CM IM and Presence Administration -> Messagin -> Group Chat Server Aliases  Mapping to check what chat_aliases are available

Once logged in the main window should look like that:

main123123123

The styling is pretty simple and can be modified.


Serviceability Control Center

Recently, I’ve decided to try out CAXL IM&Presence API (https://developer.cisco.com/site/jabber-websdk/overview/overview/) and integrate a Web chat with Jabber MUCs (chat conferences). And it turns out that XCP Web connection manager which serves BOSH interface for CAXL (or jabberwerx) can’t stand more than 100 concurrent connections. This service just went to Stopped state.

While troubleshooting that with UC serviceability web interface on CUCM (like going to Cisco unified Serviceability ->  Tools -> Control center Feature services ot Network services -> choosing a node and it takes quite some time to fetch the data) I decided to write a simple GUI for this. I’ve based my server on a API’s description from here https://developer.cisco.com/site/sxml/discover/overview/service-control/.

The source is accessible from my github https://github.com/smirnov-am/cucm_srv_cc_api.

Installation should be easy: on a server with python installed, use pip to get flask and apscheduler modules and run the script. Open a browser and enter your server IP and enter srv_mon/srv_mon when it asks for credentials.

On configuration enter your CUCM and IM&P node IPs and hit Save&Run. The UCM and IMP pages should populate with service’s states:


cc

Services that are activated and not running come first, started services are just highlighted with green, inaccessible nodes and inactivated services are grey and can be found in the end of the list.

I’m going to invest some time into it later and add service stop/start/restart capabilities to it.

It looks like you can get the same info from RTMT or PrimeCollaboration which is free if you got CUWL Pro licence. But first one is slow and the latter is very greedy for computing resources and I find my solution much more helpful when debugging service states.

How to start a Web-server with nginx+uwsgi+flask

The fastest way of providing a web interface to your Python project is, in my opinion, to use Flask (http://flask.pocoo.org/). But it’s built-in web server is good only for testing and development (in my case I’ve got some strange errors like broken pipes when I tried to put in production under moderate load). So the recommended option is to use nginx and uwsgi as a web server and flash as a backend.
1) In case of a fresh installation of Ubunty 14.04 first thing you should do is to install some packages: pip for installation of usefull Python modules, python-dev in order to enable pip to install uwsgi and nginx

sudo apt-get update
sudo apt-get install python-pip python-dev nginx

2)    Let’s also install virtualenv. Ubunty Trusty comes with python 2.7.6 which lacks ssl library. My previous idea was to install python 2.7.9 into separate directory and to use it, but later I found cool molude named requests (http://docs.python-requests.org/en/latest/) which deal with all ssl stuff, so now I’d rather use systemwide python. But in order to isolate it from other admins who like to mess with python modules it’s better to use  virtualenv

sudo pip install virtualenv

3)    Now let’s create our projects directories

sudo mkdir /opt/my_flask
cd /opt/my_flask

4)    We will store our virtualized python here with a command

sudo virtualenv my_flask_env

5)    Now we have to activate it

sudo source my_flask_env /bin/activate

And the prompt would look like:

(my_flask_env)user@host:/opt my_flask$

6)    Install flask and uwsgi

sudo pip install uwsgi flask

7)    Create a sample application with flask

sudo vi /opt/my_flask/my_flask.py

Here we need to import Flask module and create a route of / which will return HTML code when requested

from flask import Flask
application = Flask(__name__)

@application.route("/")
def hello():
    return "<span>Hello world!</span>"

if __name__ == "__main__":
    application.run(host='0.0.0.0')

8)    Now we have to create uwsgi entry point, which will link uwsgi with our flaks application

sudo vi /opt/my_flask/wsgi.py
from my_flask import application

if __name__ == "__main__":
    application.run()

9)    It’s time to make a configuration file for uwsgi

sudo vi /opt/my_flask/my_flask.ini
[uwsgi]
socket = /tmp/uwsgi.sock
module = my_flask
callable = application
enable-threads = true
chmod-socket = 666
vacuum = true
die-on-term = true
req-logger = file:/tmp/reqlog
logger = file:/tmp/errlog

/tmp/uwsgi.sock – is a special socket used as a pipe between nginx and uwsgi process and uses special uwsgi protocol.

die-on-term – will help to start and stop our process with init scripts,

vacuum is needed for socket clean up

10)    Now let’s create an upstart script and a separate user

sudo useradd --no-create-home nginx
sudo vi /etc/init/my_flask.conf
description "uWSGI server of my_flask"
start on runlevel [2345]
stop on runlevel [!2345]
setuid nginx
setgid www-data
env PATH=/opt/my_flask/my_flask_env/bin
chdir /opt/my_flask
exec uwsgi --ini my_flask.ini

11)    Starting uwsgi is simple – just type

sudo start myproject

12)    Now let’s configure nginx to connect to the socket

sudo vi /etc/nginx/sites-available/default

And inside server block paste this

server {
    listen 80;
    server_name server_domain_or_IP;

    location / {
        include uwsgi_params;
        uwsgi_pass unix=:/tmp/uwsgi.sock
    }
}

13)Restart nginx with

sudo service nginx restart

And that’s it. Navigate to http://server_domain_or_IP and I’ll be able to see Hello world!
You can aslo find all logs in /tmp/reqlog and /tmp/errlog

Monitoring device registration with CUCM Serviceability AXL API

Recently I started to receive more and more complaints from my users that my Cisco video codecs are not working. The problem was that these same users had unplugged ethernet cords from the codecs so they lost registration with CUCM. So I decided to create some tool to monitor registration status of video endpoints and possibly 7937 conference phones (they’ve got unplugged too).

I decided that CUCM Serviceability API (https://developer.cisco.com/site/collaboration/management/uc-manager-serviceability/overview/) would do.
1) Let’s install suds module (and we will need python 2.7.9 with ssl module too)

cd ~/Downloads
sudo wget https://bootstrap.pypa.io/get-pip.py
sudo python get-pip.py
sudo python -m pip install suds
cd ~/
vi srv_xml_api.py

2) Inside srv_xml_api.py let’s import only necessary parts:

import sslimport urllib2from suds.xsd.doctor 
import Importfrom suds.xsd.doctor 
import ImportDoctorfrom suds.client 
import Clientfrom suds.transport.https 
import HttpAuthenticatedfrom datetime 
import datetime, timedelta

3) Let’s also define global variable MODELS – a dictionary with device’s model id as it appears in CUCM database and its description:

MODELS={'626':'Cisco TelePresence SX20',        
        '682':  'Cisco TelePresence SX10',
        '608':  'Cisco TelePresence Codec C40'}

4) We will also need path to CUCM Serviceability API, and application user credentials to access it.

SRV_CMSERVER='192.168.0.1' #IP of CUCM
SRV_axl_port='8443'
SRV_user='srv_api_user'
SRV_passwd='****'
SRV_wsdl='https://'+SRV_CMSERVER+':'+SRV_axl_port+'/realtimeservice/services/RisPort?wsdl'
SRV_location='https://'+SRV_CMSERVER+':'+SRV_axl_port+'/realtimeservice/services/RisPort'

Note that  srv_api_user should be a part of AXLUsers, Standard CCM Admin Users and Standart CCM Super Users groups.

4) Here comes the one and only class cmdevices. It will have cur_layout and prev_layout vars – lists of dictionaries where we will store device name (as it appears in CUCM), directory number, description, IP, registration status, and model. When initializing in stance of the class I’m going to run update_current_states() method to populate cur_layout (we’ll come to this method later), and add Stat_change_at and Stat_change_reason keys to layouts to indicate when registration status has changed and what what the reason for that.

class cmdevices(object):
    cur_layout=[]  
    prev_layout=[]  
    def __init__(self):      
         self.update_current_states()      
         self.prev_layout=self.cur_layout      
         for i in range(len(self.prev_layout)):          
             self.prev_layout[i]['Stat_change_at']=datetime.now()          
             self.prev_layout[i]['Stat_change_reason']= '1strun'

5) Main method of the class would be update_current_states. It’s going to communicate with CUCM, and query it for device states.

def update_current_states(self):
    layout=[]     
    layout_reduce=[]     
    for model in MODELS:         
        t = HttpAuthenticated(username=SRV_user, password=SRV_passwd)         
        t.handler=urllib2.HTTPBasicAuthHandler(t.pm)         
        ssl_def_context = ssl.create_default_context()         
        ssl_def_context.check_hostname = False         
        ssl_def_context.verify_mode = ssl.CERT_NONE         
        t1=urllib2.HTTPSHandler(context=ssl_def_context)         
        t.urlopener = urllib2.build_opener(t.handler,t1)         
        tns = 'http://schemas.cisco.com/ast/soap/'         
        imp=Import('http://schemas.xmlsoap.org/soap/encoding/', 'http://schemas.xmlsoap.org/soap/encoding/')         
        imp.filter.add(tns)
        client=Client(SRV_wsdl,location=SRV_location,plugins=[ImportDoctor(imp)],transport=t)         
        result = client.service.SelectCmDevice('',{'SelectBy':'Name', 'Class':'Phone', 'Model':model})         
        for node in result['SelectCmDeviceResult']['CmNodes']:             
            for device in node['CmDevices'] 
                layout.append({ 'Name':str(device['Name']),                                 
                                 'DN':str(device['DirNumber'])[:4],
                                 'Description':str(device['Description']),
                                 'IP': str(device['IpAddress']),
                                 'Status':str(device['Status']),
                                 'Model':str(MODELS[device['Model']])})     
       
    return True

First part is obvious – we are connecting to CUCM using default ssl context with Basic Auth and mend our schema with Doctor from suds. But I noticed that of one of the devices lost registration with it’s first CUCM from CM_Group and register with the second Serviceability API will list this device as unregistered with 1st node and registered with the second. Let’s call this status split and assume that in that case device is registered. So you have to parse returne layout to sort this out.

6) Last method of the class you have to implement will fetch for current states from CUCM and analyze changes comparing cur_layout and prev_layout

7) That’s it – in the main part of the script you should create an instance of the class and call update_changes periodically (I personally use apscheduler python module for that) display information you are interested in from cur_layout of the instance. You can go beyond with it as I did and use Flask framework to launch web-server and show device registration status on a web page with automatic refresh.

SSH to Cisco video codecs using Python

Recently I decided to re-register all my Cisco SX20 codecs, which were controlled by Cisco VCS to Cisco Unified CM. Apart from other parameters you should provide to CUCM you need to know device’s MAC addresses. I believe that there are numerous ways to do that, but as a Python fan I’m going to show you how to do it with a simple script. By the way you can use it to connect to Cisco routers and switches (and it differs with the way you use Python to log in to Linux machine)

1) Let’s get pip, install pamiko module and create script

cd ~/Downloads
sudo wget https://bootstrap.pypa.io/get-pip.py
sudo python get-pip.py
sudo python -m pip install pamiko
cd ~/
vi python-ssher.py

2) Here comes the script. Let’s import libraries and define our hosts

import paramiko
import time
hosts=['192.168.0.1','192.168.0.2','192.168.0.3']

3) Now – the main function.

def get_mac(host):
    client = paramiko.SSHClient()
    client.set_missing_host_key_policy(paramiko.AutoAddPolicy())
    client.connect(hostname=host, username='***', password='***', port=22,  look_for_keys=False, allow_agent=False)
    client_shell = client.invoke_shell()
    client_shell.recv(1024)
    time.sleep(2)
    client_shell.send("xstatus Network Ethernet\n")
    time.sleep(2)
    output= client_shell.recv(1024)
    client.close()
    time.sleep(2)
    return output[output.find('"')+1:output.find('"')+18]

Tips:
– change username and password in client.connect callback.
– I’ve also added time.sleep(2) between executing commands – you need to give our client some time to read from output.
– after  invoke_shell() I’ve added recv(1024) to skip MOTD.
– after sending xstatus Network Ethernet my codecs return string containing something like: Network 1 Ethernet MacAddress: “E4:C7:11:22:33:44”. So I search for first quote and return next 17 symbols

4) So in the main part let’s iterate through  hosts list and just print IP address along with MAC

if __name__ == "__main__":
    for i in hosts:
    print i,', ', get_mac(i)

5) Now I’m going to put it in my CSV file and use another script, which uses CUCM AXL-Serviceability API to add devices to CUCM – stay with me to get the details!

Installation of Python 2.7.9 in Ubuntu 14.04

Ubuntu 14.04 ships with python 2.7.6 and uses it a lot for it’s internal needs. But python2.7.6 lacks very usefull module – ssl (https://docs.python.org/2.7/library/ssl.html). I like ssl.create_default_context a lot – saves a lot of work when dealing with HTTPS. So here are the steps to get separate installation of python2.7.9 leaving default 2.7.6 intact 1) You have clean Ubuntu 14.04 and now it’s time to install some important packages

sudo apt-get update
sudo apt-get upgrade
sudo apt-get install build-essential
sudo apt-get install libreadline-gplv2-dev libncursesw5-dev libssl-dev libsqlite3-dev tk-dev libgdbm-dev libc6-dev libbz2-dev
sudo apt-get install checkinstall

2) Now let’s fetch python’s source and extract it to our home directory

mkdir ~/Downloads
cd ~/Downloads
wget http://python.org/ftp/python/2.7.9/Python-2.7.9.tgz
tar -xvf Python-2.7.9.tgz
cd Python-2.7.9

3) It’s time to compile to to a separate directory (say /opt/python-2.7.9)

sudo mkdir /opt/python279
./configure --prefix=/opt/python279
make

4) Here is an important step – we are not going to make install it, but use checkinstall instead. It will create deb package and install it (so it can be easily removed later if needed, for example). We will provide custom package (python-2.7.9) name to identify it later.

sudo checkinstall --pkgname python-2.7.9

5) That’s it. Type /opt/python279/bin/python -V and it will show the version 6) You can delete it later with sudo dpkg -r python-2.7.9